Kernels of Truth
There's a good chance many of these homeowners will want to change the ceiling texture in their new homes, as the popcorn or "cottage cheese" texture look is not for everyone. That's exactly what we did when we purchased our house. The look of the texture, often called "acoustic texture," just wasn't our taste. So, we made plans to transform the ceiling to a modern, bright new surface that would give us the appearance we were after.
Here are some pointers for "un-popping" those popcorn ceilings.
Check for asbestos
The first thing we did before starting our popcorn ceiling removal project was to test the material for asbestos. If the material was applied before 1979, it could have contained asbestos. When inhaled, asbestos fibers can cause serious health problems, including cancer (contact your state's Dept. of Environmental Quality or the Environmental Protection Agency for more information on safely removing materials containing asbestos and the proper disposal requirements).To obtain test samples of our ceiling, we used an ordinary spray bottle filled with water to wet down two small areas in different parts of the house and scraped off quarter-size chunks. Sampling different areas will get more accurate results of the percentage of asbestos (if any) in the texture. Try to keep the material from crumbling while doing this, as some labs prefer to test large, whole pieces of ceiling.
We placed the samples in a plastic bag (any clean container, such as a plastic bag or small glass jar, will do) and sealed it tightly. Use a damp paper towel to clean up any material on the outside of the container or that might have spilled on the floor. We clearly labeled the container stating where and when the sample was taken and took the material to a local laboratory for analysis. We found a laboratory that does this type of analysis in the phone book under "Laboratories Analytical." The cost was roughly $40 to have the material tested and the results came back in two days.
Prep for the job
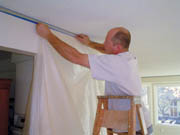
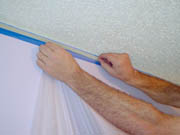
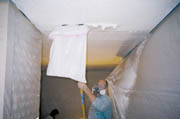
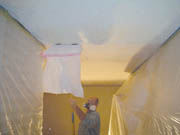
Now that we knew the makeup of the ceiling, we started the process of transforming the texture. Looking at the potential mess that faced us, we gave ourselves plenty of workspace by removing all the furniture, wall accessories and window coverings in the areas to be scraped. This gave us a clean slate and plenty of space to work.To protect the walls and floor during each stage of the project, we used plastic sheathing and brown craft paper to construct a cocoon. First, we put high-quality painter's tape where the ceiling meets the wall. Using a top-of-the-line tape will pay off when you remove the tape after the job, as it will not take off any wall paint that you would then need to repair. Next, we placed the plastic sheathing over the first layer of tape and applied more painter's tape to hold it on top of the first tape layer. The 9-foot sheathing easily reached from ceiling to floor. As always, you get what you pay for, so use high-quality plastic that will hold up to water, texture and paint without ripping.
We placed a tarp (a drop cloth can also be used) down on the floor and then covered it with the craft paper to make the bottom of the cocoon. By connecting the paper to the bottom of the sheathing using painter's tape, we completed the enclosure. Any debris that fell or splattered could now be rolled up after the project and properly disposed. And for moving from room to room, we made slits in the doorways and used tape to close them when we worked in that space.
It took a lot longer to construct the cocoon than we originally planned. For a 1,200 square-foot space, it took the good part of one full day to put it together and prepare for the scraping.
Work wet
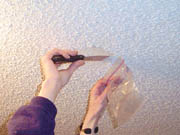
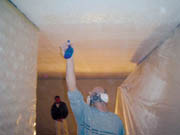
When it was time to say good-bye to the texture, the first thing we did was wet down the ceiling. Water helps to soften the ceiling texture and works to break down the adhesive bond, which makes scraping the texture off a lot easier. If the ceiling has been painted, knock off the tops of the texture to expose the underlying surface material before you get it wet. Then you can spray it with water.
We used a hand-held spray bottle to thoroughly wet the ceiling and made sure the sprayer was clean and free of any residue. We waited about 15 minutes to give the water a chance to soak into the material and then started scraping.
Start scraping
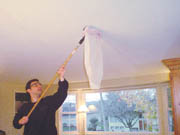
We put on proper masks to protect us from inhaling any debris and began scraping the ceiling. To remove the popcorn material, we used the Ceiling Texture Scraper, manufactured by Homax Products. We attached an everyday plastic trash bag to the spring steel blade of the scraper, used an extension handle to reach the ceiling and began. With the ceiling being wet, the material came off in large chunks and looked a bit like oatmeal when it was peeling away.
By scraping, the old ceiling material fell into the plastic bags and limited the amount of debris that ended up on the floor and in the air. We were careful to keep the scraper at an angle parallel to the ceiling so we wouldn't damage the ceiling drywall. For the corners and hard-to-reach areas, we used a small razor to make sure all the texture was removed. Scraping approximately 1,200 square feet took about six hours but with the debris falling right into the trash bags, cleanup was manageable.
Clean up and results
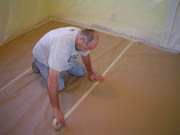
With the acoustic texture gone, we sanded the ceiling, primed the tape joints, fixed a few cracks, sprayed on a new texture, and painted the surface.
As for cleanup, working room by room we carefully removed the tape from the ceiling/wall joint and let all the sides gently fall to the ground. We rolled up the cocoon and placed it into proper disposable bags. We took a shop vacuum and went around the floor molding to pick up any debris that made its way out of the cocoon and replaced all the furnishings. Now when we look up, we have the new, updated ceiling we were hoping for.
Sidebar: Six Steps to a New Ceiling
1 Test for asbestos: Use a spray bottle to wet the ceiling and scrape a small sample. Have the sample tested at a laboratory for asbestos content.2 Remove all furnishings: Give yourself plenty of workspace. Take out all furniture, wall and window coverings from the area to be scraped.
3 Build a cocoon: Use painter's tape, plastic sheathing and brown craft paper to build an enclosure that will protect walls and floors from debris.
4 Wet down texture: Apply water using a spray bottle or garden sprayer to the acoustic ceiling texture. Allow it to sit for 15 minutes and then spray again just before scraping begins.
5 Start scraping: Use a ceiling scraper to remove the texture from the ceiling drywall. The water should soften the texture into an oatmeal-like consistency. Be sure to use even strokes and avoid puncturing holes in the ceiling.
6 Clean up: When the project is complete, roll up the cocoon from each area, along with the debris, and safely remove from the home and dispose.
Looking for a reprint of this article?
From high-res PDFs to custom plaques, order your copy today!


